I use Get-Content a lot (or cat, gc, and type as its alias) to display or track the contents of a file. There are different parameters for it, and in this blog post, I will show you what you can do with those 🙂
- What is Get-Content?
- Using Get-Content
- With no Parameters
- With the -AsByteStream Parameter
- With the -Delimeter Parameter
- With the -Encoding Parameter
- With the -Exclude Parameter
- With the -Filter Parameter
- With the -Include Parameter
- With the -Path Parameter
- With the -Raw Parameter
- With the -ReadCount Parameter
- With the -Stream Parameter
- With the -Tail Parameter
- With the -TotalCount Parameter
- Using the -Wait Parameter
- Wrapping up
What is Get-Content?
“The Get-Content cmdlet gets the content of the item at the location specified by the path, such as the text in a file or the content of a function. For files, the content is read one line at a time and returns a collection of objects, each representing a line of content.
Beginning in PowerShell 3.0, Get-Content can also get a specified number of lines from the beginning or end of an item.”
Using Get-Content
From my early MS-DOS days, I tended to use type a lot in command-line interfaces to display text files. But I also use Linux and the cat command for it. Luckily, PowerShell has you covered and introduced those two as an alias for Get-Content, but also (even shorter) gc 😉 In the command line, it’s always ok to use aliases, but in scripts (I configure my Visual Studio Code to automatically convert those aliases (See https://powershellisfun.com/2024/09/12/my-powershell-for-visual-studio-code-extension-settings/ for configuring that) those aliases are converted to Get-Content for better readability.
With no Parameters
When you use Get-Content without any Parameters, it will show the contents of a file in your Terminal like this:

In this example, I displayed the contents of my PowerShell profile for Windows Terminal, which has the Functions and Modules I use often.
With the -AsByteStream Parameter
Using the -AsBytestream Parameter enables Get-Content to read the contents as a stream of bytes. It can’t be combined with the -Encoding Parameter and is useful for reading from binary files. For example:
Get-Content -Path C:\Temp\BinaryFile.txt -AsByteStream
With the -Delimeter Parameter
You can split a file’s contents into objects using the -Delimiter Parameter. The default is the end-of-line character “\n”. For example, I used the exclamation mark sign as a delimiter for the IntuneManagementExtension.log file and stored it in a variable $test.
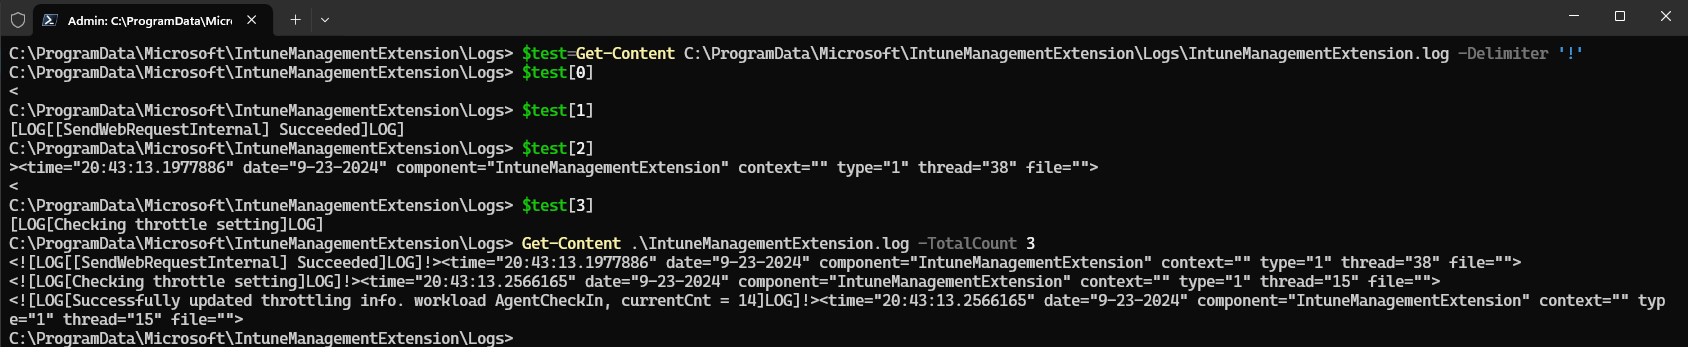
It splits the data into objects I return to the screen using $test[0], $test[1], etc. The output of the first three lines, using Get-Content .\IntuneManagementExtension.log -TotalCount 3, shows that it has been split using the ‘!’ character.
With the -Encoding Parameter
You can use the -Encoding Parameter to read the file in a certain encoding if needed, the default format is utf8NoBOM These are the ones that are available:
ascii: Uses the encoding for the ASCII (7-bit) character set.ansi: Uses the encoding for the for the current culture’s ANSI code page. This option was added in PowerShell 7.4.bigendianunicode: Encodes in UTF-16 format using the big-endian byte order.bigendianutf32: Encodes in UTF-32 format using the big-endian byte order.oem: Uses the default encoding for MS-DOS and console programs.unicode: Encodes in UTF-16 format using the little-endian byte order.utf7: Encodes in UTF-7 format.utf8: Encodes in UTF-8 format.utf8BOM: Encodes in UTF-8 format with Byte Order Mark (BOM)utf8NoBOM: Encodes in UTF-8 format without Byte Order Mark (BOM)utf32: Encodes in UTF-32 format.
For example, you can use -Encoding utf8 to read the IntuneManagementExtension.log in that format:
Get-Content -Path C:\ProgramData\Microsoft\IntuneManagementExtension\Logs\IntuneManagementExtension.log -Encoding utf8
With the -Exclude Parameter
This parameter can only be used with the -Include Parameter to view the contents of files in a folder matching the -Include Parameter value and exclude the ones specified by the -Exclude Parameter. For example, this will show the contents of all log files in the C:\ProgramData\Microsoft\IntuneManagementExtension\Logs folder except the IntuneManagementExtension logs:
Get-Content C:\ProgramData\Microsoft\IntuneManagementExtension\Logs\* -Include *.log -Exclude IntuneManagementExtension*.log
With the -Filter Parameter
You can use the –Filter Parameter to filter for specific files for which you want to display the contents. In the example below, I used it to read all the Sensor logfiles in the C:\ProgramData\Microsoft\IntuneManagementExtension\Logs folder:
Get-Content C:\ProgramData\Microsoft\IntuneManagementExtension\Logs\* -Filter sensor*.log
With the -Include Parameter
This works similarly to the -Filter Parameter. You can include specific files using wildcards, etc., but it can also be combined with the -Exclude parameter. For example, to view the contents of all sensor logfiles in the C:\ProgramData\Microsoft\IntuneManagementExtension\Logs folder, you can use this:
Get-Content C:\ProgramData\Microsoft\IntuneManagementExtension\Logs\* -Include sensor*.log
With the -Path Parameter
Using the -Path Parameter, you can specify the whole path to the file that you want to retrieve the contents of. (You don’t need to specify it; it will understand and take the filename for the -Path by default) For example:
Get-Content -Path C:\ProgramData\Microsoft\IntuneManagementExtension\Logs\IntuneManagementExtension.log
With the -Raw Parameter
Using the -Raw parameter, you can get the entire file’s contents as one string instead of an array of strings separated by the newline delimiter. For example, this will add the whole contents of the IntuneManagementExtension.log in the $test variable:
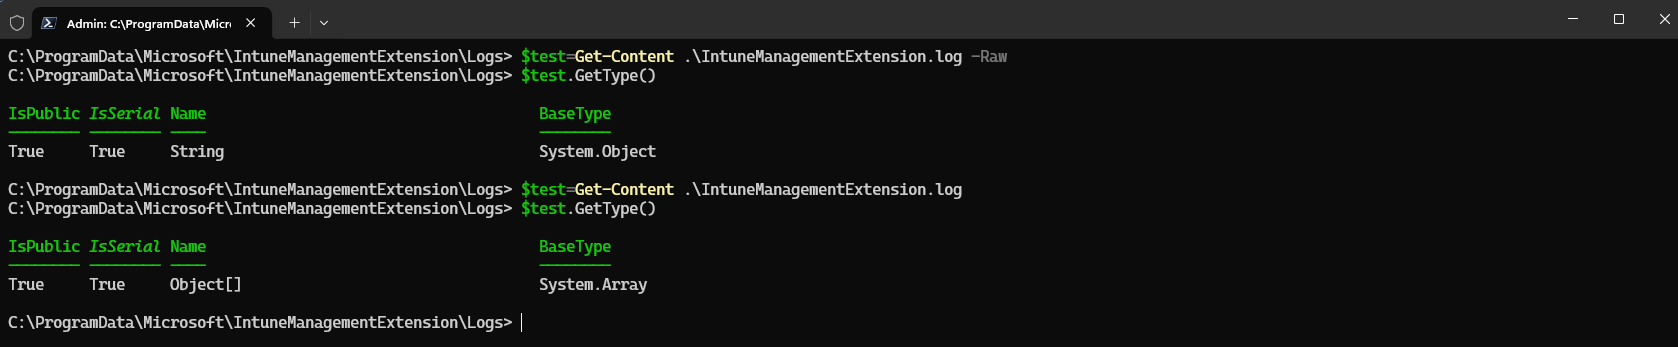
You can see the difference between the type of the $test variable when running it with and without the -Raw Parameter. (String versus Array)
With the -ReadCount Parameter
Using the ReadCount Parameter, you can specify the number of lines that should be read at a time. This is practical when reading large files in a pipeline; however, returning the first line will increase the time, but the total time of the operation will decrease. In the example below, I use Get-Content to display the contents of the IntuneManagementExtension.log, which contains 13660 lines, and filter for the word Error in it using Select-String:

Without the -ReadCount 1000 option, it took 82,6408 milliseconds; with it, it took 23,6658 milliseconds. I benchmarked it a few times, and it’s consistent, but increasing the -ReadCount Parameter value to 2000 or higher didn’t make that much of a difference anymore on a file containing 13660 lines 🙂
With the -Stream Parameter
Using the -Stream Parameter, you can get the content of an alternate stream for files on an NTFS volume. For more information, you can read https://learn.microsoft.com/en-us/powershell/module/microsoft.powershell.management/get-content?view=powershell-7.4#example-5-get-the-content-of-an-alternate-data-stream (Not something that I have a use-case for at the moment / never used it 😀 )
With the -Tail Parameter
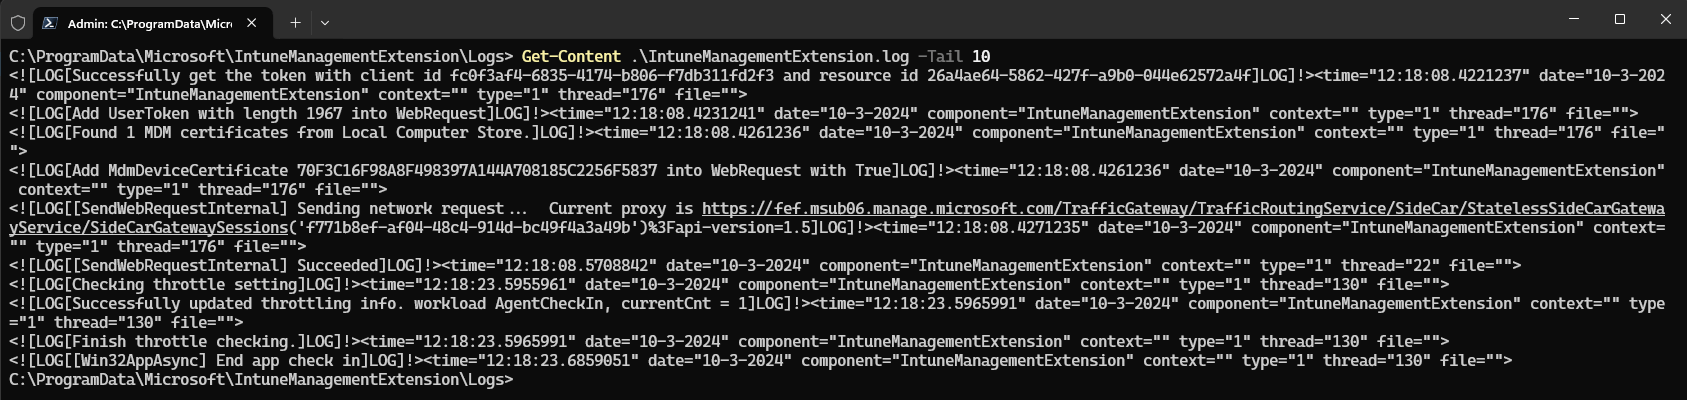
The -Tail Parameter allows you to display the last X lines of a file. For example, if you use -Tail 10, it will show the last 10 lines of the file.
With the -TotalCount Parameter
Using the -TotalCount Parameter, you can retrieve a specific number of lines in a file, making viewing just a few lines of a large file easier. In the example below, I used it to view the first 10 lines of the IntuneManagementExtension.log file:

You can also use [-1] to display the last line of those specified 10 lines, for example:

Using the -Wait Parameter
The -Wait Parameter does what I expected from the -Tail Parameter; it will wait and show newly added lines in the specified file. (Tail is the Linux command to monitor a file). For example, using Get-Content IntuneManagementExtension.log -Wait will monitor the file for you after showing the file’s contents first. (You can limit that to displaying the last 10 lines combining -Wait with -Tail 10, and afterward, it will keep waiting for new lines)

After restarting the Microsoft Intune Management Extension Service, it showed the extra lines that were added without doing anything (Your Terminal will be paused until the file changes)

The extra lines tell you that the service host has started. It starts checking the device and initializing the agent, which is lovely for tracking progress. You can stop monitoring the contents of the file using Ctrl-C.
Wrapping up
In this blog post, I showed you how to use the Get-Content cmdlet to display file contents, speed up read performance using -ReadCount, and monitor a file using Wait, etc. Powerful options, enjoy them 🙂