

I like to test my network connections to see if they’re reliable and what the capacity really is. There’s a PowerShell module for that with some nice options and reporting: Invoke-NetStress 🙂
What does Invoke-NetStress do?
“Invoke-NetStress is a production-grade, zero-dependency network benchmarking tool designed to push bandwidth links to true queue saturation without requiring third-party listeners on the destination server. It features an interactive pre-flight target & intensity wizard, an in-place real-time ANSI terminal dashboard, live latency sparklines, an automated Bufferbloat Quality Grading engine (A+ to F), strict authorization guardrails, and instant report generation (HTML, JSON, CSV).
📸 Real-Time ANSI Terminal Dashboard
╔══════════════════════════════════════════════════════════════════════════════╗
║             INVOKE-NETSTRESS: REAL-TIME NETWORK SATURATION ENGINE            ║
╠══════════════════════════════════════════════════════════════════════════════╣
║ Profile: Medium    | Mode: Duplex   | Sockets: 16  | Ping Target: 1.1.1.1     ║
╠══════════════════════════════════════════════════════════════════════════════╣
║ PROGRESS   : [============>       ] 60% (18.0s / 30s)
║ DATA STATS : Total Transferred: 845.2 MB | Peak Link Rate: 428.15 Mbps
╠══════════════════════════════════════════════════════════════════════════════╣
║ THROUGHPUT :
║   • Download : [████████████░░░░]   312.40 Mbps
║   • Upload   : [████░░░░░░░░░░░░]   115.75 Mbps
║   • Combined :                      428.15 Mbps
╠══════════════════════════════════════════════════════════════════════════════╣
║ LATENCY & BUFFERBLOAT :
║   • Baseline Ping : 14.2 ms
║   • Current Ping  : 23.8 ms (+9.6 ms)  Jitter: 2.1 ms
║   • Ping Sparkline: [ ▂▃▅▇█▆▄▃  ▂▃▅▆ ]
║   • Packet Loss   : 0 / 18 (0.0%)
║   • Active Grade  : [ GRADE: A ] - Great Queue Discipline
╚══════════════════════════════════════════════════════════════════════════════╝
  Press [Ctrl+C] to abort stress test early and generate final reports.
🚀 Key Features
🔀 Cross-Platform & Cross-Version: Fully compatible with Windows PowerShell 5.1 and modern PowerShell 7+ on Windows, Linux, and macOS.”
🏎️ Hardware-Level Asynchronous Sockets: Utilizes .NET HttpClient with RunspacePool concurrency to reliably saturate multi-gigabit links with minimal CPU overhead.
🎯 Interactive Pre-Flight Wizard: Prompts for target IP and displays rated throughput estimates across 4 intensity profiles before execution.
📊 Real-Time ANSI Dashboard: Flicker-free console monitoring complete with live throughput meters, active latency sparklines, and second-by-second link statistics.
📉 Bufferbloat & Queue Delay Grading: Continuously measures bufferbloat and assigns an industry-standard quality grade ( to ) based on latency delta under saturation and packet loss.
🌐 Public CDN & Private LAN / Air-Gapped Testing: Supports public high-capacity edge networks (Cloudflare CDN) as well as internal enterprise endpoints (-DownloadUri, -UploadUri) for private LAN, SD-WAN, and VPN stress testing.
🛡️ Built-In Authorization Guardrails: Mandatory consent mechanism (-AcknowledgeAuthorization or interactive prompt) prevents accidental or unapproved network flooding.
📑 Instant CSV Reports Saved in Root Folder & Reports Directory: Automatically outputs comprehensive .csv telemetry right into your working folder as well as the reports/ archive.
Source: https://github.com/AlphaMvge/Invoke-NetStress
How to install
You can install the module using:
Install-PSResource -Name Invoke-NetStress
or, when PSResourceGet is not available:
Install-Module -Name Invoke-NetStress
After installing, Invoke-NetStress is available.
Using the module
You can use it without Parameters, and it will ask you questions, but you can override the defaults or configure it to your needs using the Parameters below.
Parameters
| Parameter | Type | Default | Description |
|---|---|---|---|
-Intensity | String | Medium | Preset intensity: Low (4), Medium (16), High (32), Extreme (64). |
-Mode | String | Duplex | Traffic direction: Duplex (Simultaneous Down/Up), Download, Upload. |
-Duration | Int | 30 | Duration of test in seconds (5 to 3600). |
-PingTarget | String | 1.1.1.1 | Target IP or hostname to ping continuously for queue delay. |
-CustomThreads | Int | 0 | Explicit socket count (overrides -Intensity). |
-DownloadUri | String | Cloudflare CDN | HTTP/S endpoint for download streams. |
-UploadUri | String | Cloudflare CDN | HTTP/S endpoint for upload streams. |
-PayloadChunkMB | Int | 2 | Size of upload buffer chunks in megabytes. |
-AcknowledgeAuthorization | Switch | False | Compliance flag confirming authorization to stress-test the network. |
-ReportPath | String | reports | Output directory for HTML, JSON, and CSV exports. |
-NoReport | Switch | False | Suppresses saving report files. |
-SimpleDisplay | Switch | False | Disables ANSI dashboard for traditional scrolling output. |
-PassThru | Switch | False | Outputs test result object directly to the PowerShell pipeline. |
Default usage
When you run Invoke-NetStress, it asks which server to ping to test your connection, then lets you select the load you want to stress your equipment with (by default, your own internet connection). For example (I’m running this on my MacBook M1 Pro on a 4 Gbps internet connection):
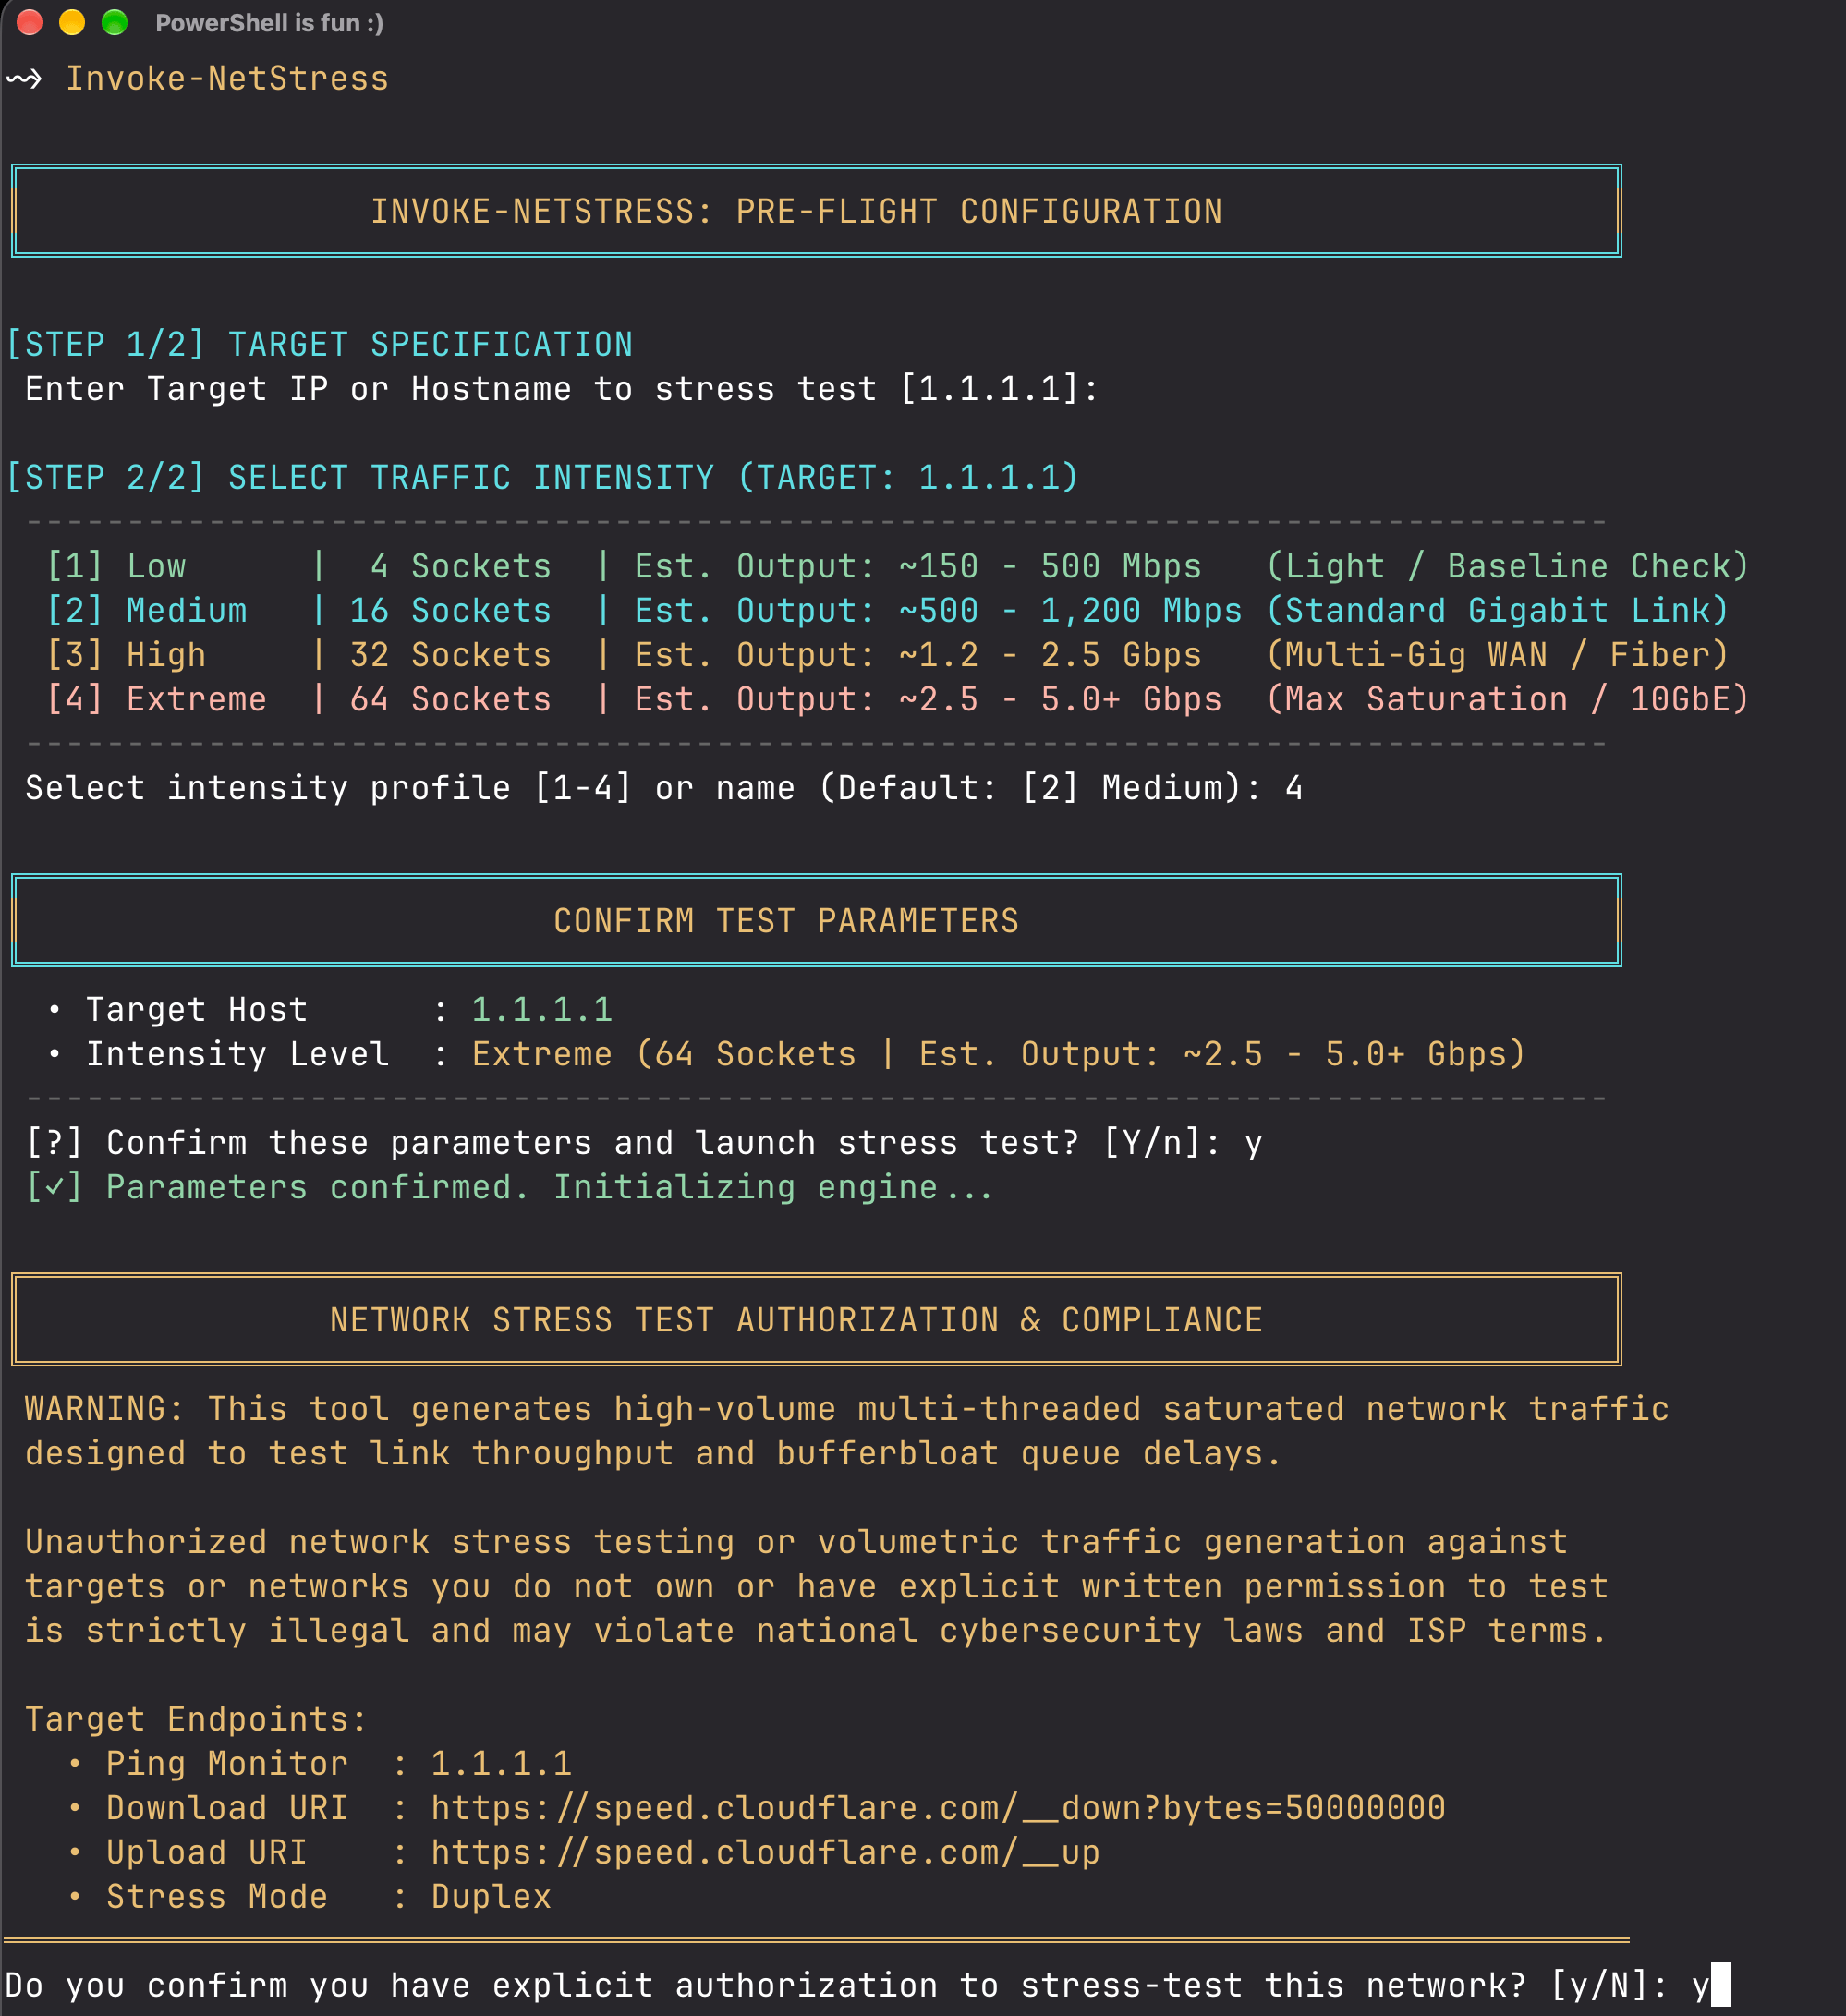
In the screenshot above, I specified no target IP (Defaults to 1.1.1.1), and what intensity it should use (I selected 4 (Extreme). After confirming with Y, and confirming again with Y that you have explicit authorization to stress test, it looks like this while running:
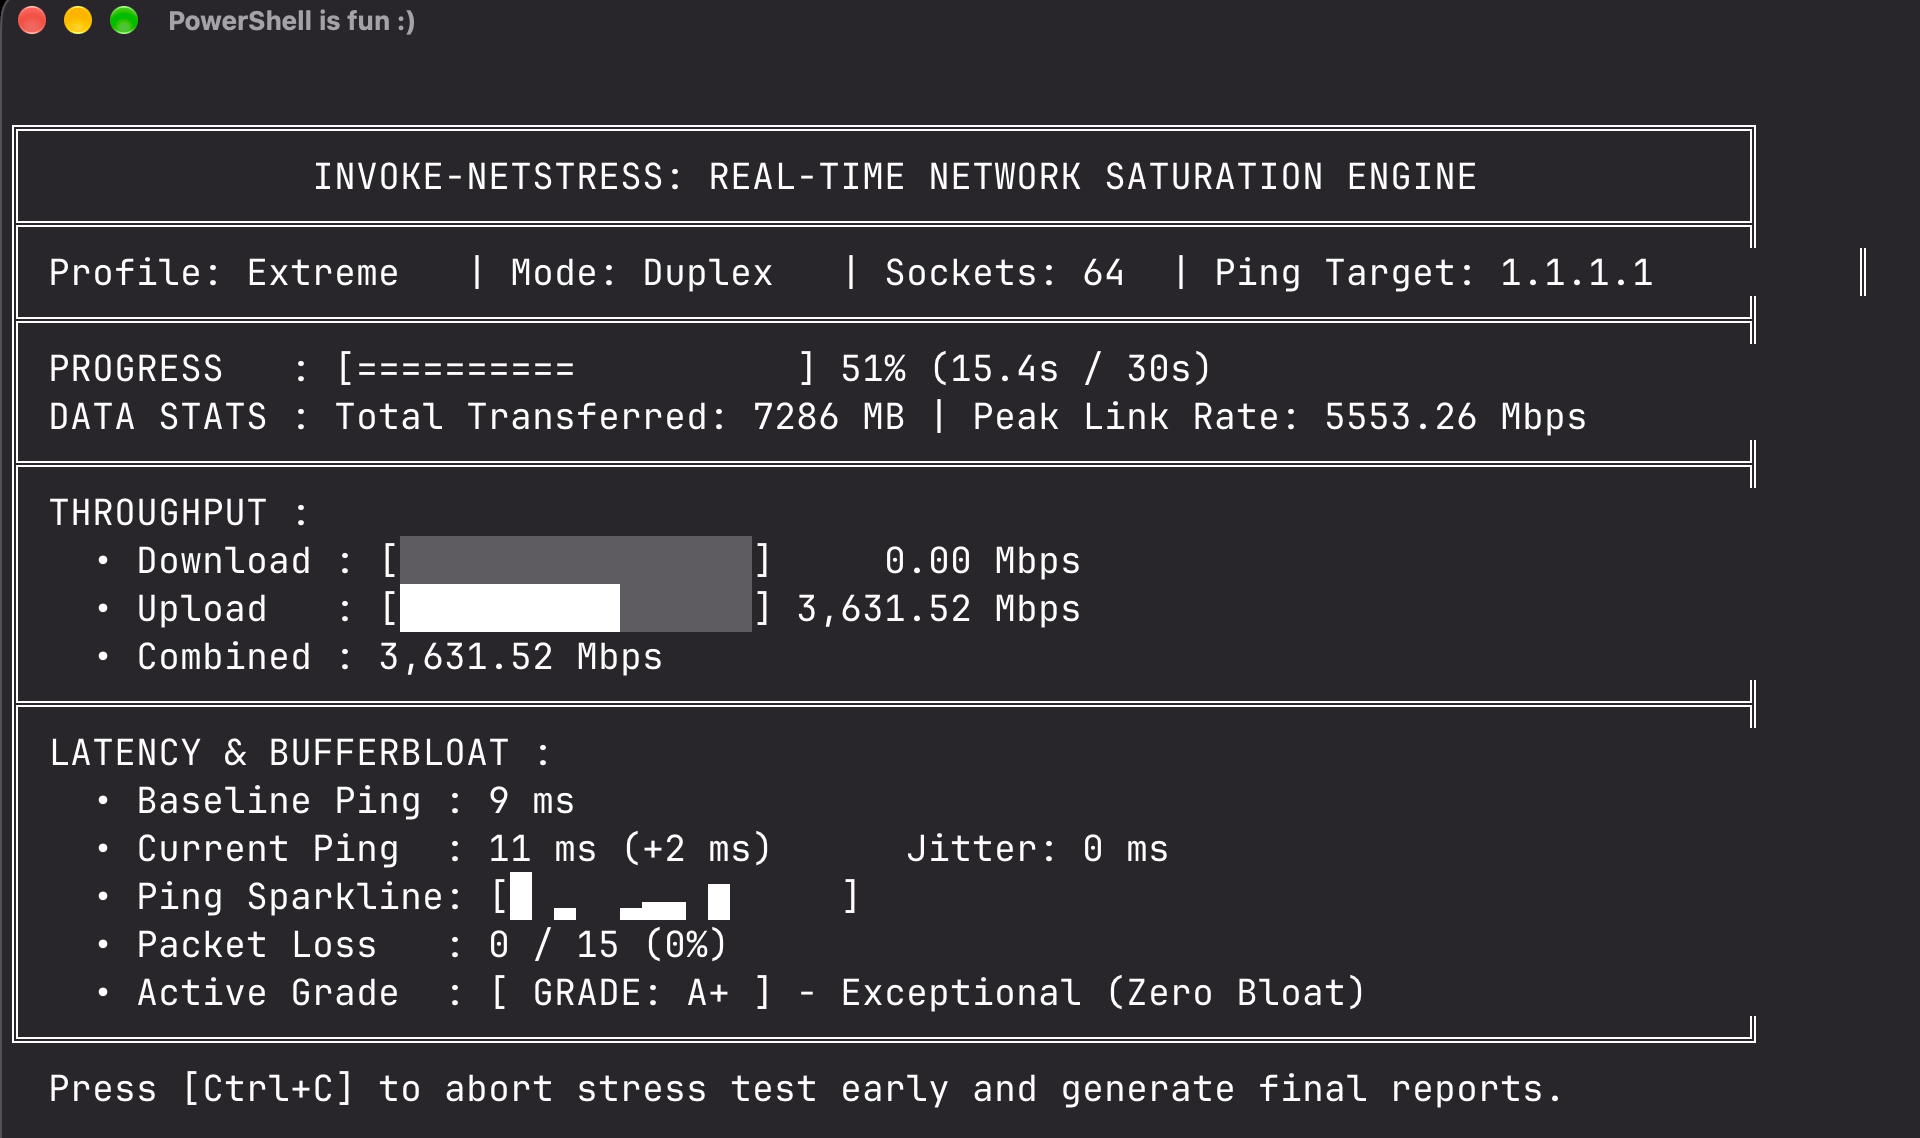
When done, it will show the results on screen:

You can review raw stats and data in the JSON and CSV files, but the HTML report looks pretty good 🙂

Local testing
On the GitHub page, there’s also an example command line that tests local infrastructure again by downloading a large file and uploading it again (You will need to configure a web service for that, of course):
.\Invoke-NetStress.ps1 `
    -DownloadUri "http://192.168.1.100:8080/large.bin" `
    -UploadUri "http://192.168.1.100:8080/upload" `
    -PingTarget "192.168.1.1" `
    -Intensity Extreme `
    -Duration 30 `
    -AcknowledgeAuthorization
More information
For more examples, reporting, CI/CD & pipeline integration, check https://github.com/AlphaMvge/Invoke-NetStress.
Wrapping up
And that’s how you can benchmark and stress-test your internet connection or equipment. Have a lovely weekend!
powershell.exe -ExecutionPolicy Bypass -File .\Invoke-NetStress.ps1
At C:\Users\bsg\Downloads\Invoke-NetStress.ps1:170 char:35
+ Write-Host ” [1] Low | 4 Sockets | Est. Output: ~150 – 50 …
+ ~
Expressions are only allowed as the first element of a pipeline.
At C:\Users\bsg\Downloads\Invoke-NetStress.ps1:170 char:37
+ Write-Host ” [1] Low | 4 Sockets | Est. Output: ~150 – 50 …
+ ~~~~~~~
Unexpected token ‘Sockets’ in expression or statement.
At C:\Users\bsg\Downloads\Invoke-NetStress.ps1:171 char:34
+ Write-Host ” [2] Medium | 16 Sockets | Est. Output: ~500 – 1, …
+
Expressions are only allowed as the first element of a pipeline.
At C:\Users\bsg\Downloads\Invoke-NetStress.ps1:171 char:37
+ Write-Host ” [2] Medium | 16 Sockets | Est. Output: ~500 – 1, …
+ ~~~~~~~
Unexpected token ‘Sockets’ in expression or statement.
At C:\Users\bsg\Downloads\Invoke-NetStress.ps1:172 char:34
+ Write-Host ” [3] High | 32 Sockets | Est. Output: ~1.2 – 2. …
+
Expressions are only allowed as the first element of a pipeline.
At C:\Users\bsg\Downloads\Invoke-NetStress.ps1:172 char:37
+ Write-Host ” [3] High | 32 Sockets | Est. Output: ~1.2 – 2. …
+ ~~~~~~~
Unexpected token ‘Sockets’ in expression or statement.
At C:\Users\bsg\Downloads\Invoke-NetStress.ps1:173 char:34
+ Write-Host ” [4] Extreme | 64 Sockets | Est. Output: ~2.5 – 5. …
+
Expressions are only allowed as the first element of a pipeline.
At C:\Users\bsg\Downloads\Invoke-NetStress.ps1:173 char:37
+ Write-Host ” [4] Extreme | 64 Sockets | Est. Output: ~2.5 – 5. …
+ ~~~~~~~
Unexpected token ‘Sockets’ in expression or statement.
At C:\Users\bsg\Downloads\Invoke-NetStress.ps1:284 char:33
+ public long GetDownload() { return System.Threading.Interlock …
+ ~
An expression was expected after ‘(‘.
At C:\Users\bsg\Downloads\Invoke-NetStress.ps1:285 char:31
+ public long GetUpload() { return System.Threading.Interlocked …
+ ~
An expression was expected after ‘(‘.
Not all parse errors were reported. Correct the reported errors and try again.
+ CategoryInfo : ParserError: (:) [], ParentContainsErrorRecordException
+ FullyQualifiedErrorId : ExpressionsMustBeFirstInPipeline
I tested it myself by installing the Module and using the Function, but if you downloaded the .ps1 file from the GitHub page… I just tested that, without Parameters it runs just like it would when using the Module on my system? But that’s in PowerShell v7 (Macbook), I’ll test it in Windows PowerShell (v5), too
It has just been updated so that it works in PowerShell v5 again!